> ## Documentation Index
> Fetch the complete documentation index at: https://docs.webradioplayers.com/llms.txt
> Use this file to discover all available pages before exploring further.
# Managing Streams
> Add, test, and manage the audio source URLs that power your web players and public pages.
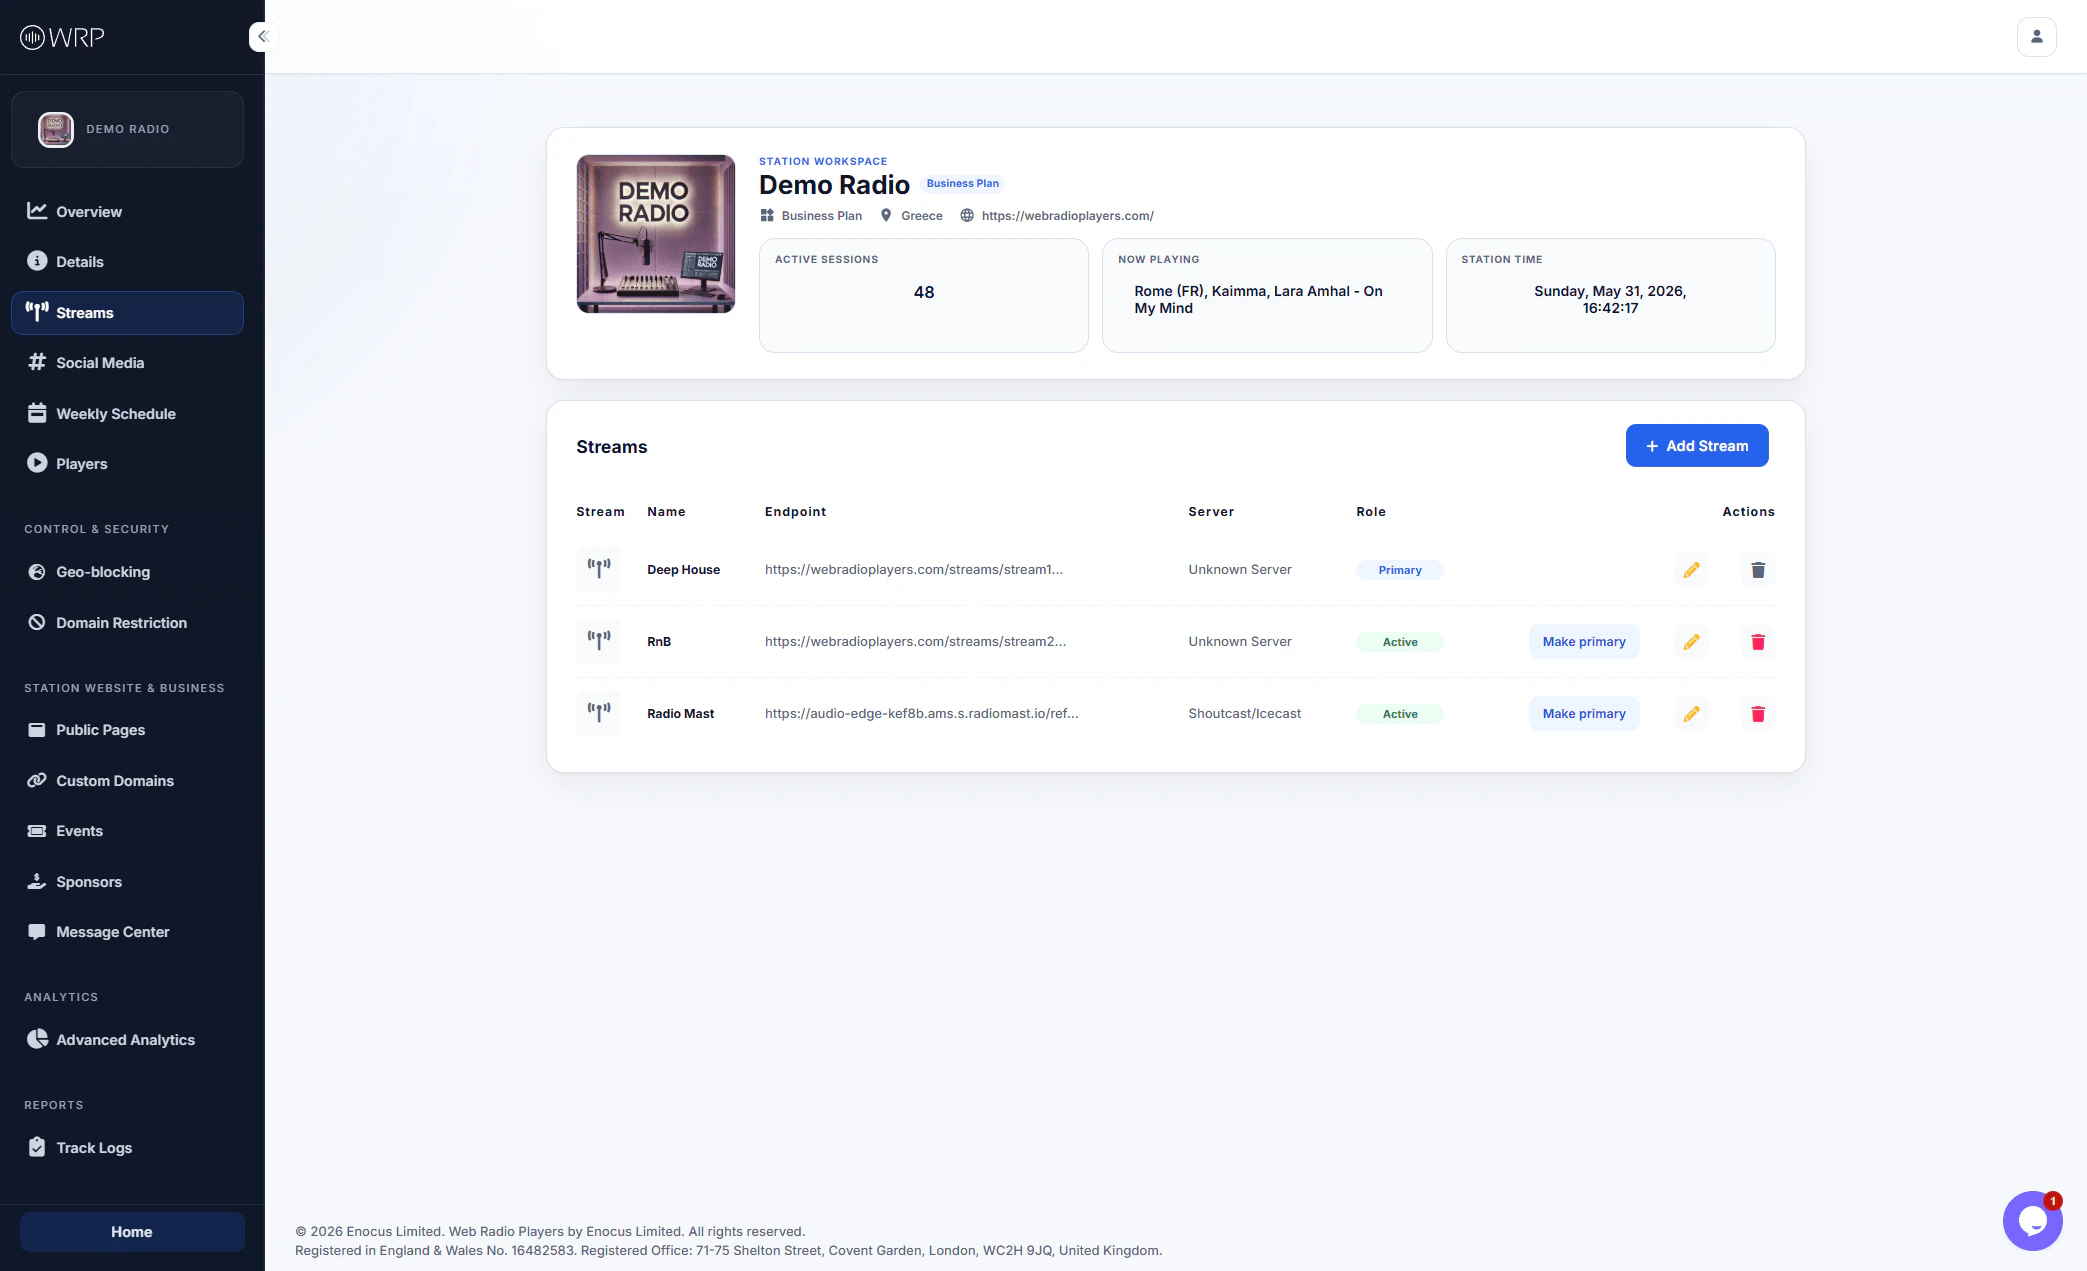
The **Streams** page is the audio engine of your station workspace. This is where you connect your external broadcasting servers (like Icecast, Shoutcast, or AzuraCast) to the Web Radio Players platform.
Once you add your streams here, they become available globally across your account, allowing you to easily assign them to different custom players, public pages, or multi-stream widgets later on.
 ## Adding a New Stream
Adding a new stream is simple, and our built-in testing tool ensures you never publish a broken link to your listeners.
Click the blue **+ Add Stream** button in the top right corner of the Streams panel.
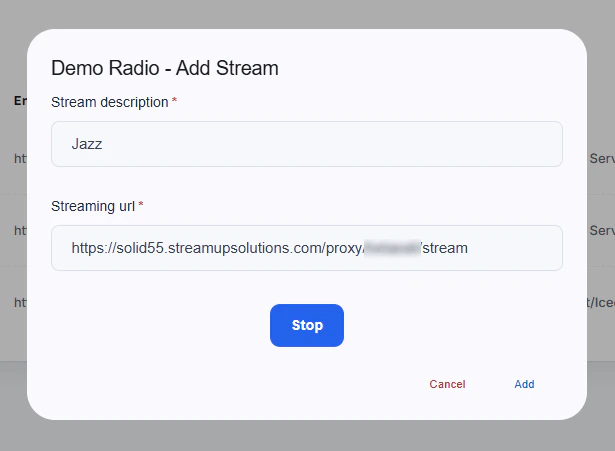
* **Stream Description:** Give your stream a clear, recognizable name (e.g., *Deep House*, *Jazz*, or *Main Broadcast*). This name will appear in player menus if you offer multiple channels to your listeners.
* **Streaming URL:** Paste the direct HTTPS URL of your audio stream.
Before saving, click the large blue **Play/Test** button in the center of the modal. The button will change to **Stop** while the audio plays. If you hear your broadcast, your URL is perfectly formatted!
Click **Add** at the bottom right to save the stream to your station.
## Adding a New Stream
Adding a new stream is simple, and our built-in testing tool ensures you never publish a broken link to your listeners.
Click the blue **+ Add Stream** button in the top right corner of the Streams panel.
* **Stream Description:** Give your stream a clear, recognizable name (e.g., *Deep House*, *Jazz*, or *Main Broadcast*). This name will appear in player menus if you offer multiple channels to your listeners.
* **Streaming URL:** Paste the direct HTTPS URL of your audio stream.
Before saving, click the large blue **Play/Test** button in the center of the modal. The button will change to **Stop** while the audio plays. If you hear your broadcast, your URL is perfectly formatted!
Click **Add** at the bottom right to save the stream to your station.
 **Need HTTPS?** Modern web browsers (especially Safari and Chrome) will block mixed content. Ensure your streaming URL begins with `https://` to guarantee playback on all devices.
## Stream Roles and Actions
Once you have added one or more streams, they will appear in your Streams table. From here, you can manage how they function within your workspace:
### Primary vs. Active Roles
* **Primary:** One stream must always be designated as your Primary stream. This acts as your default fallback. When you create a new public page or a basic player, the system will automatically use your Primary stream unless you specify otherwise.
* **Active:** Any additional streams you add are marked as Active. You can use these to build multi-channel players (e.g., a player that lets listeners switch between *RnB* and *Jazz*).
* **Make Primary:** You can swap your default stream at any time by clicking the **Make primary** button next to any Active stream.
### Editing and Deleting
To the far right of each stream, you will find the **Actions** menu:
* **Edit (Pencil Icon):** Opens the modal to update the stream's name or URL, and re-test the connection.
* **Delete (Trash Icon):** Permanently removes the stream from your workspace. *(Note: You cannot delete a stream if it is currently set as Primary. You must assign a new Primary stream first.)*
**Need HTTPS?** Modern web browsers (especially Safari and Chrome) will block mixed content. Ensure your streaming URL begins with `https://` to guarantee playback on all devices.
## Stream Roles and Actions
Once you have added one or more streams, they will appear in your Streams table. From here, you can manage how they function within your workspace:
### Primary vs. Active Roles
* **Primary:** One stream must always be designated as your Primary stream. This acts as your default fallback. When you create a new public page or a basic player, the system will automatically use your Primary stream unless you specify otherwise.
* **Active:** Any additional streams you add are marked as Active. You can use these to build multi-channel players (e.g., a player that lets listeners switch between *RnB* and *Jazz*).
* **Make Primary:** You can swap your default stream at any time by clicking the **Make primary** button next to any Active stream.
### Editing and Deleting
To the far right of each stream, you will find the **Actions** menu:
* **Edit (Pencil Icon):** Opens the modal to update the stream's name or URL, and re-test the connection.
* **Delete (Trash Icon):** Permanently removes the stream from your workspace. *(Note: You cannot delete a stream if it is currently set as Primary. You must assign a new Primary stream first.)*